Tuesday, September 8, 2009

Hobbyist: Workspace

I can’t write a line today without saying that every hobbyist deserves a dedicated workspace/place. I once had a study but as soon as the baby came after marriage, Titi turned it to the baby room. I have been running my projects from a desk in our bedroom. This has always been a subject of concern to Titi. My projects lay in the balcony, the guest bedroom, the walkway the guest bedroom and sometimes our bedroom.

With Titi away on a one week break to United States, I moved into the room permanently. I must confess it was a sorry sight by the time she returned to find that the door of her wardrobe was a prop for my make-shift spray booth. That the entire floor was littered with metal fillings from drilling multiple holes in the rotor hub. Half the space on the king-size bed was covered with tools, and other equipment. I moved the jig from the balcony to the bedroom.
To cut a long story short – the pressure was on to hook up the turbine and hoist it on the roof, while I start the second phase and test the turbine.

Putting it on the roof was exciting…. I couldn’t help but wonder if it would spin or not. Though I could feel the cool breeze, I knew it was not as fast or focused like the electric fan I used to test the turbine in the house. I ran the line down to my flat 2 floors down allowing enough slack to ensure I can cut (if the wire twist around its axis) the wire to fix a plug to routinely unwind the twist.

Just as the final bolts where being tightened, the turbine caught the wind and like they say the rest is history…

I will put up a video of the turbine flying as soon as I can upload one on u-tube. But I was such a pleasure to watch people stare at the alian object on my roof as the walked by. I gave me so much satisfaction to see the smile on their faces - that suggested this house hold has gone "green". Eventhough I was yet to rig it up to the grid, I was humbled that with the help of the internet, I too could cut down on use fossil fuel and save the ozone.

As soon as I finish the volts up option to boost the output current, I can officially say - Phase 2 over!

Wednesday, September 2, 2009

“Gear Up” or “Volt Up” Part 2

Volts Up
While testing the turbine on a jig, I realized that there was a need to boost the voltage, I identified two different approaches to solve the problem. the first one, Incorporating gears to speed up the turbine did not come up to scratch as it was crude, noisy and would require strong winds to turn the blades. So I was left with the second option - The electronic voltage boost.

A simple DC – DC conversion should be able to boost my 8 Volts to about 16 Volts. I saw circuit diagrams from numerous hobby sites – but they all had some unique integrated circuits (ICs) like Max (http://para.maxim-ic.com/en/search.mvp?fam=stepup&tree=powersupplies), y, z, that local electronics component stores did not stock. I had almost given up on this option (planning to return to perfect the gears option above) when I stumbled on a power boost circuit that used a simple 555 timer. The 555 series of ICs is one of the most versatile IC in the whole world – and yes, we do have plenty of them in Nigeria.

http://www.elecfree.com/electronic/voltage-doubler-with-ic-555/ posts a simple 555 voltage doubler circuit. See google result - http://www.google.com.ng/search?hl=en&q=555+voltage+doubler+circuit&btnG=Search&meta=

The components are:-
  • NE555 timer IC
  • 2.2k ohm resistor
  • 15k ohm resistor
  • 0.01 uF ceramic capacitor
  • C2, C3 220 uF electrolytic capacitor
  • C4 470 uF electrolytic capacitor
  • D1, D2 1N4002 diode

This circuit will now increase the output voltage from 8Volts to about 16volts. Optionally, I can throw in a regulated 14Volts at the end of this to ensure the output never exceeds 14Volts. One problem though is current. Will this circuit provide enough current? I will cross that bridge when I get there. For now, this will no doubt charge a flat battery.

Monday, August 31, 2009

“Gear Up” or “Volt Up”

While testing the motor on a bench, I soon realized that the motor outputs an average of about 9 volts. 3 volts shy of the recommended charge voltage. To my mind, there were two solutions I could employ. One mechanical and the other electronic. The two options were bound to work, but one was easy, and the other wasn’t.

Gear Up
The first option, the mechanical one was to employ gears to speed the motor. Reading up the topic showed that gears were not recommended for small turbines. It was crude at best, and when it worked, it was noisy and heavy. These were problems I was willing to live with as long as it worked. In its simplest form, it required two gears. I found a motor cycle clutch gear for a measly N800 ($5). And put them to work.

I assembled the two gears on a sheet of white paper. I pressed this against a platform to create an impression on the paper. I then proceeded to design my assembly around this trace.

A trip to the “Turner” (metal works ) resulted in the complete assembly below. All that is left now is to grease it up and bolt it on the motor.
But that was not to be, as I realized that the gear was much too stiff, and required a significant amount of force to set it rolling. I doubt that the cool breeze of Garki could force that hard. I should have employed ball bearings to ensure that everything was at the right angles, perhaps, I might have been able to pull of the mechanical option.

Thursday, August 27, 2009

The Aesthetics

I have been writing about the epileptic power distribution and generation in Nigeria and how I built my home made wind turbine to supply 3500watts (>2 horse power) to my home in Abuja. We have seen how to make the blades, the alternator, the Mounts and bracktes, the hub. Beyond function I guess one sure selling point should be the aesthetics:-

The Tail Fin
Though the tail fin does not have any moving parts, it had a very important function. Besides lending itself to branding the turbine, the fin is solely responsible for turning the blades to face the wind. To make this happen, it needed to cover a significant area to ensure that the turbine turns at the slightest change of wind direction.
Branding
The projects I saw on the internet focused solely on the bare bone turbine. They didn’t care about what it looked like. As an artist, that was not an option - certaininly wasnt going to happen here, it was impossible to make that excuse. So, I had to design and paint my turbine.

There was no rule to follow here, I just bought and cut a sheet of plastic, and cut out “Tantiblow” (Tantiblo is my wife’s nick name) on it. I sprayed it black and it looks pretty neat. Almost like a commercial brand.

The Blades

I had to respray the blades several times during my build - as they often became dirty from handling them inbetween builds. I thought about painting the tips blood red to give a visual cue to prevent my son from walking into it while it was spinning. I thought that might also help the birds that might want to pearch on it.

The Cover

One of the most visible parts would be the cover of the motor. I made it from a short pvc pipe. I cut two circular pieces to cover the front, and the back one had circular vents.

Beveled and sanded down. This should protect the turbine from the elements.

Next time I will write about the power.

Monday, August 24, 2009

The Mount and Brackets

I have been writing about the epileptic power distribution and generation in Nigeria and how I built my home made wind turbine to supply 3500watts (>2 horse power) to my home in Abuja. I stumbled on a note on the internet about a government project (http://www.windfair.net/press/4068.html) in Katsina aimed at harnessing wind energy for local communities. Nice to know that Government has caught on – I have also noticed uncountable solar street lights in various Nigerian towns and wish them luck on their project. We have seen how to make the blades, also how I put the motor together. Now, we will see how I built the mount, mast and brackets.

The Mount and Brackets
One of the questions on ….. blog was how he managed the line. I came up with a brilliant design that would ensure that the line did not tangle or obstruct the swinging of tail boom. The design employed the use of a small ball bearing on which a tube was sandwiched between the alternator mount and the horizontal pole.

Since I have no metal work skills or experience, I had to turn to the experts. Again, nomenclature would rare its ugly head. I asked everyone to refer me to competent metal workers that could machine parts; no handy man in Nigeria knew what I meant. I tried welders, black smiths to no avail. Then just by share luck, I stumbled upon a mechanic who had just fabricated a vehicle AC bracket. He was the one who gave me the local name for metal workers – they are called “Turners” (because of their spinning tools like bench drills, CNC, etc). So if you need to fabricate any metal, be sure to ask for a “Turner”.

If you are interested in making professional looking 3D drawings like this, use Google Sketch - quite intuitive.


The drawing above shows how my turbine is mounted and this mount cleverly conceals the wires from the turbine inside the mast to the house.

If you are interested in making professional looking 3D drawings like this, use Google Sketch - quite intuitive.

Friday, August 21, 2009

The Alternator and Hub

I have been writing about the epileptic power distribution and generation in Nigeria and how I built my home made wind turbine to supply 3500watts (>2 horse power) to my home in Abuja. I stumbled on a note on the internet about a government project (http://www.windfair.net/press/4068.html) in Katsina aimed at harnessing wind energy for local communities. Nice to know that Government has caught on – I have also noticed uncountable solar street lights in various Nigerian towns and wish them luck on their project. We have seen how to make the blades, so I will go to the motor:-
The Alternator
I spent days on end at Deide (a suburb of Abuja) Pantaka looking for PMC Alternators that were light enough to haul up in the air, and most importantly drive at least 12 volts on a low RPM. Due the poor electric power generation in the country, there were large alternators to be found everywhere, these would serve well for a large wind turbines but not the tiny one I plan to build. I checked on ebay for turbine generators, but considered my rules, I decided against importing a wind generator on eBay. I eventually found a 2.5 Horse Power 230 Volts, 4000 RPM motor that looked like it seen better days. After cleaning it up, and changing the carbon brushes, it was good enough to use.

Unfortunately, they couldn’t find a hub to fit the motor when I bought it, so that meant I had to machine a new hub to fight the motor and also hold the wings.


(Update)
My old friends from university all came to visit me over a “private matter”, while we were drinking out, I happened upon a broken down machinery and lo and behold, in it sat a light weight Treadmill motor. Though the motor was not rated, it compared better than the 90 volts one I bought earlier. Luckily this time, there was a fly wheel with a pulley for a 6 track belt drive. Just what I have been looking for.

Picture of the new motor
The Hub
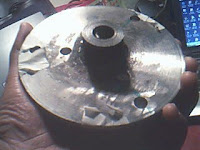
I had initially fabricated a pulley for the first motor, but it rattled and vibrated dangerously when I fitted the blades and ran the motor with the aid of an electric fan. You can clearly see the wrong holes are not aligned- the lines show where they should have oriented from

The vibration was due to miscalculated angles for the blades. The three blades were meant to be at a 120 degree intervals, but my over enthusiastic “Turners” drilled the hole by sight. I guess nobody taught them the rule – measure twice and cut once! From now on, I must be present while all my job is done.

They now all weigh a little over 7kg each. I also noticed that the blades weighted significantly different from each other. So i had to plane-off each blade to bring them all to the same weight. They now all weigh a little over 7kg each.


Cheap fix, weld in the wrong holes and re-bore new ones in the right place At first I didn’t want to start from scratch, so I tried to fill and drill the six holes at the right angle again. But after buying the second motor with a flywheel, I went ahead to drill the new hub.


(Update)
Show picture of the new hub with holes

Tuesday, August 18, 2009

Phase 2 - Buying and Fabricating the Parts

Phase 2 – Buying and Fabricating the Parts
If you have been following my post on how to building a cheap wind turbine to support an existing power inverter, you would know that though an off the shelve model will set you back over $3,000 but with locally assessable materials and not so much DIY skills you can build one for yourself.
I have written about the design and concept at http://tantiblo.blogspot.com/2009/08/phase-1-designing-turbine.html Lets now focus on buying the stuff we need. In the west, one could have walked into Home depot, Curries, or other local DIY or hubby shops, but in Naija – I had to go to the open market.

The Blades
The first and perhaps easiest parts to fabricate are the blades. Following the blueprint I saw at http://www.yourgreendream.com/diy_pvc_blades.php,


Since the pipe wasn’t brand new, the rim was not cut at the right angle - nut tied to a string from the rim, like a plumb and traced the string to get a perfect vertical straight line. Positioning a laser level at the right angle (90 degree) to get my bearings. I cut the four blades with a jigsaw.


I then sanded each blade down with a belt sander and extra smoth sand paper. I sprayed on a matte white finish to make them more presentable.

After cutting the parts out I shaped it with a belt sander, flat file and smooth sand papers, ensuring that all blades not only look alike, but weight the same. This will ensure that the turbine does not vibrate itself to smithereens.

Sunday, August 16, 2009

Phase 1 – Designing the Turbine


The Concept
Holistically, my plan was to harness the energy of the wind to generate between 10 – 15volts DC to charge two 12volts 200m Amps Deep cycle batteries which will in turn power my inverter.

On a more detailed level, the logic of the entire system would be to regulate the erratic current supplied by an alternator to a more tolerable band, and feed the current to a bank of batteries, ensuring that as soon as the battery is topped up, the current is diverted to prevent the batteries from frying.


Simple as this plan sounds, it will be fraught with challenges that I hope to share with you on my blog http://tantiblo.blogspot.com/ .

Thursday, August 13, 2009

Hold The Power For As Long As You Like (Part 3)

The Solution

Like most solutions, start by Googling up the topic. It wasn’t long before I realized that some people had had their hands on this already, and it looked like they all came away with a relative margin of success. But by and large, I learnt that there was no need to reinvent the wheel. They had already drawn up a blueprint of some of the major components to fabricate a wind turbine.

One of the first thing to consider when building a wind turbine is to ascertain how windy the target location is – for those in the west, there is a chart of average wind speed in different areas in the USA and even in the UK – I guess they use this for air navigation data (several private pilots, and wind-sports related enthusiasts) but in Naija where our past presidents insist that Nigeria has no business in space, no such chart exists. In the absence of this data, I used common sense - as a rule of thumb; coastal cities are generally windier than landlocked cities. Rural areas are generally windier than built up locations.

coastal cities are generally windier than landlocked cities. Rural areas are generally windier than built up locations.


This rule clearly put me at a disadvantage, Abuja is land locked, and built up – but I figured that if I put my turbine high up on the roof of a 3 – 4 storey building, I should catch the “Gulf Steam”. (or so I thought)

I started out with a short shopping list of a few items
• Motor Alternator
• Bicycle Speed Meter (wired)
• Hub for the rotor blades
• PVC Pipes
• 5 Core Wire (one roll)
• Mount Pipes and brackets
• Nuts, Screws, Washers and Bolts

The projects I saw on the internet had shopping list of items one could easily find at your local DIY, home improvement shop, but for three reasons I had to look elsewhere – My rules;
1. Here in Nigeria, there were no hobby shops to run to.
2. I was not willing to waste money. I was going to salvage items and make do with whatever I can find that fits the bill.
3. Will only resort to buying new of off-shore items if and only if, I am unable to get one locally

I turned to junk yard to find my parts – finding a junk yard was more difficult than I first thought. Until I learnt that our people had their own name for it. Its called “Panteka” (from the sentence “Pan Taker” – people who collect pans). Hilarious! Finding Pantakas was much easier.

... more tomorrow.

Tuesday, August 11, 2009

Hold The Power For As Long As You Like!! (Part 2)

This is a continuation of my last post on the epileptic power problem in Nigeria.

In 2007, I invested in an Inverter. I bought a 3.5 KVA Sukam Inverter http://www.blogger.com/www.sukam.com. It set me back almost N300,000 (about $1,986) for the unit, four deep cycle batteries, and the rewiring of my home. I consider it the best thing I have ever bought. It provides an uninterrupted clean (pure sine wave) power supply to my home, augmenting the epileptic local power utility and it us devoid of all the nuisance of noise, fire hazards of storing combustible gasoline or diesel in my home, cost ofuel, increasing my carbon footprint, etc. …that a generating set would create. To cap it all, it is designed to run unattended. So if the power fails at 3:00am, I will not wake up in a pool of sweat – as the Inverter would kick-in and also switch off when the power returns. Stress free you say? …Not quite.

Okay I will cut to the chase. When fully charged, the inverter supplied power for upwards of 8 hours (depending on what was powered on), so my only problem was that I needed about 3 - 4 hours of constant electric power supply from the grid to recharge my battery bank. But with the power holding company (PHCN – Please Have Candles Nearby) supplying less and less power everyday, I was forced to think up a solution fast. Since I live in sunny Abuja in the heart of Africa, the most obvious solution would be to buy solar cells and have the sun recharge my batteries during the day – but you would be surprised how much those things cost. A cheap solar panel would set you back N70,000 (about $463) and I needed about 4 – 8 to do the work. In these hard times, who wants to throw that kind of money at such a problem, so I had to look for another alternative.

I knew that a wind turbine would also do the honors, but at $3,000 they are not cheap too, but unlike the solar cells they were relatively easy to make – so I made one. I will spend sometime on this blog to explain how I built the above turbine for less than N30,000 ($x). I will do it in 5 phases:-

1. Phase 1 – Designing the turbine
2. Phase 2 - Buying and fabricating the parts
3. Phase 3 – Testing the turbine
4. Phase 4 - Hooking it up to the grid
5. Phase 5 - Lessons Learnt

Enjoy. See a video of its first flight...


Sunday, August 9, 2009

Hold The Power For As Long As You Like!!! Part 1

The Problem
Our sole power utility company has struggled over the years to provide constant electric power but have failed woefully. Nigeria Electric Power Authority (NEPA) generated and distributed electricity through few hydro-electric dams scattered around the country. Like most government run outfits, NEPA could hardly meet the demands of the people, with poor management, its dilapidated infrastructure and an ever increasing demand by the populace, all indices pointed southwards…and it came to be referred to as NEPA - Never Expect Power Always.

Government has recognized the fact that power (amongst others things) was the main problem that has hindered technological development in the country. Power accounts for a huge chunk of expenses of every business in the country and adds to the cost of the product or service. Even small scale businesses are not exempt from the problem. When communication service providers were asked to lower their tariff, they sighted power provision as the main reason why Nigerians pay the highest tariff in the world.

This problem is further compounded by the cost of refined petroleum products. Though Nigeria is the 5th largest oil producer in the world, we still import refined products. The cause of the problem suggests that no doubt a few people have enriched themselves in the importation of generators, refined oil products and the continued mismanagement of the relevant institutions that should correct these problems. That is a story for another day.

Only recently, NEPA was privatized, reborn and renamed PHCN (Power Holding Company of Nigeria) but like the proverbial old wine in new wine skin, the problems still persist.

Major multinationals like Michelin, Deawoo Motors & Phyzer, have relocated to neighboring countries, in search of more energy. Though government has sunk huge sums of money into the power sector, we are yet to see the results. The administration of Olusegun Obasanjo spent ……billions, with nothing to show for it. The present administration of Musa Yar-adua is prosecuting corrupt administrators of the fund – we are waiting to see the outcome.

CNN once aired “My Favorite Gadget” as a segment of their technology watch program, and their Nigerian bureau fielded their power generation set as their favorite. They spoke my mind, I wonder where we will be without our generators.

Shakabula

Like every other service in Nigeria, you have to solve it yourself. If the water taps don’t run, you sink a bore hole in your house. If the police won’t provide security, you create your own – or consult God or Babalawo (whichever you find more accessible). If the government won’t build your street, you pour gravel, periwinkle shells, stones etc to pave the road. To a large extent I think therein lies our problem as a nation, in the west, people come together (Class act) to force the local authorities to perform. But in Nigeria we say “Leave them!” “God will punish them!!” “Don’t mind them!!!” Our politicians know too well that nobody will stand up to hold them accountable – so the looting continues. You ask “what can we do? “

That’s a story for another day.

Friday, August 7, 2009

Long Time No Write! Okay!


Its time to break the silence. Its been over 10 months since my last post here, and I am sure everyone is wondering what was happening to me.


For the past year and a half, we (Titi and I) have been running helter-skelter! Lagos, The UK, and India. Chisaa our little baby girl was diagnosed with a brain tumor and we fought long and hard to save her life, but as faith would have it – she passed on in May at a mere 2 years old. Life can be so cruel at times, make one wonder…

May her gentle soul rest in perfect peace.

I took a well deserved break from work to be with Titi and Chisom. Before long, I was bored and needed to keep my hands busy on another project. The first thing that came to my mind was….. Wait for it….. Electric Power!

Well you won’t believe it, but I have been trying to solve one of Nigeria’s oldest and perhaps most lingering problem – Electric Power generation.